The process of steaming and frothing milk involves heating milk while simultaneously injecting air into it to prepare it for use in an espresso-based specialty coffee drink (espresso drink). When making a latte or cappuccino, both the quality of the espresso beans and the quality of the milk (or milk alternative) is important.
The goal of steaming milk is to create a creamy milk with a rich, velvety taste. Atop the steamed milk is the foam.
Producing High Quality Foam for Espresso Drinks
A high quality foam is not large-bubbled, and it also should not be dry like a meringue. The foam is not something that just floats atop your gourmet espresso drink, it contains fine qualities that enhance and blend with the espresso drink in a harmonious expression of the drink's essence.
Proper steaming and aeration while steaming and frothing milk results in a silky and frothy steamed milk as well as a smooth, high quality foam.
It All Starts With the Very Cold Milk
To create high quality, frothy steamed milk and foam first make sure to use milk that you have just taken from a sufficiently cool refrigerator. Though you can use low fat milk, you will get a better taste with one or two percent milk, and whole milk creates the best foam of all.
Generally the higher fat content (e.g., whole milk or cream) results in more of a silky texture and flavor though less of an increase in volume while steaming. Fill up your steaming pitcher about one-third full with the very cold milk.
Dairy Alternatives by Barista Prima
There's a number of high end products on the market that let you make lattes and cappuccinos like a professional barista. Unlike the cheaper almond, soy and coconut milk typically found in a grocery store, products like those by Barista Prima are specially formulated for frothing. Their unique formulation allows them to create micro-foam, and retain that foam for longer. They're great for latte art!
Purge the System Before You Start Steaming
Before you begin steaming make sure to purge the system of its water by using a damp towel and placing it over the steam wand while you release the pressure valve for one to three second.
This will keep you from getting any hot water into the milk you are steaming and frothing. It also helps to eliminate any bacteria or particulates that may have accumulated on the inside surface of the steaming wand since last use. Be careful as you do this because the steam of the espresso machine will be at a very high temperature.
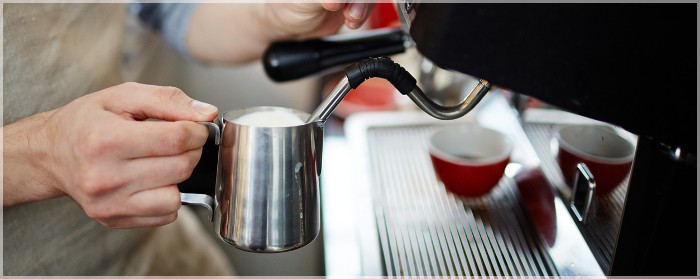
Steams Away!
Now you are ready to start steaming! First place the steaming wand down into the steaming pitcher with the tip of the wand submerged not to far below the surface of the milk. Now the steam power can be turned on by turning the espresso machine's steam knob.
Keep the steam wand tip aimed just bit away from the milk's center so that the liquid starts to spin in a circular vortex.
Remember that the steam wand tip is not submerged too deep, but just deep enough to stay below the surface and also prevent the tip from emerging which produces inferior frothed milk and can also splatter hot milk around.
Bubbles produced when this happens tend to be big rather than fine, and don't have much taste.
Maintain the Vortex for Optimal Steaming and Frothing
As the vortex spins around the steaming and frothing will occur naturally as you hear a hiss that lets you know air is being properly injected into the milk to create the desired effect.
It takes a bit of practice, but when you find that sweet spot you will know you are creating some great steamed and frothed milk and foam.
Keeping the steam wand in this perfect location also means that it is not necessary to raise or lower the steaming pitcher while you are steaming the milk except for the slight lowering of the pitcher that will be required as you continue the rolling action of the milk and the volume of the milk expands.
If steamed properly the milk's volume will double or even triple depending on what type of milk you used and your steaming technique.
Maintain Proper Aeration For a Rich and Velvety Texture
Because you have the steaming wand at just the right angle and applying just the right amount of steam pressure into the milk, the milk will continue to spin around and grow richer in texture and you will be properly aerating (injecting air) as you continue the steaming process producing a very creamy, high quality milk ideal for espresso based specialty coffee drinks.
Make sure to the steam want tip stays just underneath the surface of the milk, lightly kissing the surface at just the right angle and sweet spot to maintain the rapid flow of the vortex.
If there are excess bubbles forming deepen the position of the steam wand to increase steam pressure and then start aerating again as you hear the high-pitched hissing noise.
If you want to produce a relatively high quantity of foam, for a cappuccino for example, then you will want to leave the steam wand near the surface of the milk for a bit longer in order to create this foam.
A High Quality Foam Can Be Poured and Shaped
If you are steaming properly than any big bubbles that form should just roll back into the frothing milk, and that any bubbles that do persist will be very tiny and quite velvety in texture. The foamy froth should form atop the mixture with a rich texture that allows it to be shaped and poured.
Once the milk exceeds 145 degrees Fahrenheit cease the steaming process. Allowing the milk to become any hotter risks the milk being tainted with a burnt taste due to the scalding effect of excess heat.
If some pesky large bubbles won't seem to go away then try tapping the steaming pitcher very lightly a few times on a hard surface.
Tidy Up Once You Are Done
Once you have finished steaming and frothing the milk then you should clean off the steaming wand thoroughly.
Use a wet, folded towel to throughly wipe down the steaming wand and also turn on the steam for just a moment to blow any milk out of the steaming wand.
Now enjoy your rich, thick, and velvety-textured steamed milk and foam!
The Very Finest Gourmet Coffee on Earth!
Read about the world's top coffees including Organic Coffee, Fair Trade Coffee, Bird Friendly Coffee and Shade-Grown Coffee.
Also included are full details about Coffee Makers and Espresso Machines (including Pod Espresso Machines).
Master Barista Guide For Fantastic Espresso Drinks
Perfect espresso brewing is described along with tips on Pulling A Perfect Espresso Shot and Steaming and Frothing Milk.
Also check out the How to make a Latte with comprehensive details and instructions for Espresso Drink Recipes.
Thank You! for visiting Espresso Coffee Guide and Reading Steaming and Frothing Milk! Savor Your Coffee and Espresso!
Shimaa Mohamed says
I have Delonghi EC 820, the steamer is very hot that doesn't foam the milk, it is heating the milk very fast before making the foam, I don't know how to control the steamer. any suggestions?!
Dennies says
Hey,
Thanks for this wonderful guide. I'm actually using a separate milk frother which does the job well. Will try your tips next time!
Thanks,
Dennies
Duane Burge says
Why do you need to remove any water out of the wand before steaming the milk? I don't bother any more because I honestly can't tell the difference if a cup has a few extra drops of water in the milk.
EspressoCoffeeGuide says
More than just cleaning out a few drops of water, purging the steam wand blows out any particulates that may have accumulated on the inside of the steaming wand. When you turn off the steaming wand, milk has a chance to enter the steaming wand and with the high heat, dry itself onto the sides. Even with proper rinsing/cleaning, a steaming wand that sits unused for most of the day has the opportunity to accumulate dust and other bacteria on the inside surfaces - which then get blown into your drink!
Make sure to purge the steaming wand before each use by running it for 2-3 seconds into an empty cup.
Ruth Leversedge says
Your explanations and instructions for the beginner barista's milk techniques are very helpful. Our tutor at Whitireia New Zealand in Wellington showed us your site. Thank you.